This article describes how a fully closed circuit rebreather works. The article also descibes the parts of a CCR and how to dive the unit. The article focuses on the Ambient Pressure Evolution rebreather but most of the article is applicable to any modern CCR on the market.
Introduction Closed Circuit Rebreathers or CCRs are the most sophisticated dive units available for recreational use. They are very gas efficient and offer longer and deeper dives than any other recreational dive units. CCRs do however require more training for the diver in order to be able to operate them safely. This article focuses on the Evolution rebreather from Ambient Pressure but the basic principles do not differ too much from other CCRs on the market. The article is based on diving with air as diluent which limits the maximum depth to approximately 50 meters. For deeper dives you would subsitute the air with trimix which is described in this article.
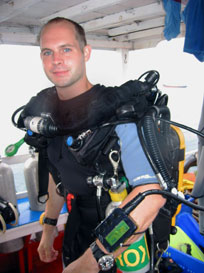
The author ready to go diving with the Evolution CCR
How a CCR works A CCR reuses the breathing gas that the diver exhales in order to preserve gas and avoid bubbles. It cleans the exhaled gas from carbon dioxide and adds consumed oxygen which makes the gas mix possible to reuse. Carbon dioxide is cleaned chemically when the exhaled air passes a canister filled with granulated soda lime known as the scrubber. Oxygen is added either manually by the diver or automatically by a computer controlled valve. The computer is set to maintain a certain partial pressure of oxygen which it monitors using three oxygen sensors. When the oxygen level falls below the "setpoint" the computer triggers an electrical solenoid valve to inject more oxygen.
A CCR has a few hoses and valves which can be broken down to being either part of the breathing loop or being part of the gas mixing system. The picture to the right shows the breathing loop system and how gas exhaled by the diver passes through the system before it is being reused.
Gas can be added to and removed from the breathing loop in a number of different ways. Under normal circumstances oxygen will be added automatically when the oxygen level goes low. During the descent when the breathing bags are compressed the automatic diluent valve will add air diluent to compensate for the lost volume. Gas can also be added manually using the two buttons on the front of the CCR and removed manually either using the dump valve or by breathing out through the nose.
There are a couple different parts involved in the elcetrical system of the rebreather. The oxygen level is measured by the oxygen sensors and the values are interpreted by the computer. If the value goes below the computers setpoint then the solenoid is triggered and oxygen is added to the loop. Under normal operation the computer display will show oxygen pressure, depth and dive time and the head-up display will glow green. If something goes wrong then the head-up display will flash red, the buzzer will sound and the computer display will show what is wrong. The picture on the bottom to the right show the inside of the lid to the scrubber canister where the oxygen sensors are located.
A typical dive Before heading out to the dive site you need to fill gases and soda lime scrubber. Since the rebreather is doing the mixing, filling the tanks is easier than when using a SCR and you simply fill air in the diluent tank and oxygen in the oxygen tank. The scrubber is filled by removing the lid of the scrubber canister and lifting out the scrubber container inside. Fill the scrubber while tapping the side of the scrubber to avoid any unwanted channels where gas can pass through. If you haven't used the rebreather recently or if other people have been using it then it is also a good idea to disinfect the breathing loop.
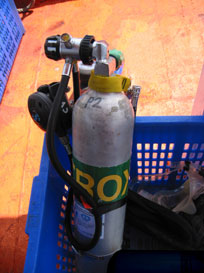
5.5 liter sling tank
You should also prepare a 5.5 liter slingtank with air to use as an open circuit bail-out if something goes totally wrong with the rebreather. You may also want to turn on the electronics just to make sure that the batteries are ok and that everything is in good shape. Male divers should also shave as one of the very first dive preparation to avoid any unwanted leaks into the mask which wastes precious gas.
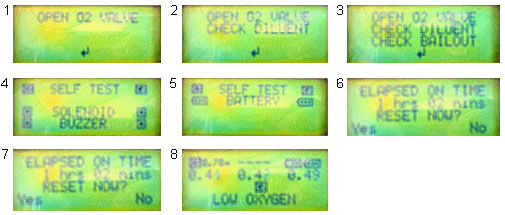
On the dive site there are a few steps to prepare the rebreather for diving. First you do a visual inspection of the inside and the outside to make sure everything is looking fine with straps, hoses and cables in place. Then you check that the rebreather does not have any leaks by doing an over pressure and an underpressure check. The overpressure check is done by rotating the overpressure valve clockwise to close it and then blow into the mouthpiece until the counterlungs are fully filled. Wait for a few minutes and make sure it stays inflated. The underpressure test is done by first closing the automatic diluent valve and then sucking out all the air from the loop while squeezing the breathing loop hoses. Again leave the unit for a few minutes and make sure the hoses arent inflating. Last predive check is to turn on the computer and follow the instructions. The computer will take you through a couple of steps as seen on the pictures to the right. First you are reminded to turn on the gas and check the pressure of your oxygen, diluent and bailout tanks. Then there is a self check and a oxygen sensor calibration is demanded if you have not already done one on the day. The calibration basically means opening the mouth piece and letting the rebreather get flushed with 100% oxygen while the computer checks the output of the sensors. Last your are asked if you want to reset the runtime timer. It is good practice to use this to track scrubber usage time so reset it if you have filled fresh soda lime. After all checks are done the rebreather is ready to be used. It is quite likely that you get a low oxygen warning initially before the unit has injected enough oxygen but it will go away after less than a minute. If you need extra lead you may also now want to insert some weights into the shoulder weight pockets.
Vision software boot sequence
When it is time to dive it is good to put everything on and take a few breaths in the rebreather to make sure that the partial pressure of oxygen is ok and that the solenoid is firing properly. If you have the mouth piece in the mouth when entering the water you need to hold onto it so it doesn't fall out. It is a good sign if you just barely sink when you empty the BCD since then you will have much less problem with controlling bouyancy caused by depth variations. An unnessary inflated BCD on the bottom will very quickly become an unwanted lift bag when ascending. The first step when descending is to stop at around five meters depth and let your buddy check that there are no escaping bubbles from you while you turning around 360 degrees. After you do the bubble check you descend to the bottom while you will notice that the automatic diluent valve will inject air to compensate for lost volume when the breathing bags are compressed. At the time you reach the bottom you will likely have to inject a slight amount of air into the BCD to become neutrally boyant. When you are stable and ready to start swimming you need to switch the computer over to use the high setpoint for the partial pressure of oxygen. This is simply done by holding in the middle button and the top left corner will change from showing 0.7 to 1.3 if you are using the factory default values.
During the bottom time you should every minute keep an eye on the oxygen partial pressures on the computer display to make sure that they stay close to the setpoint value. It is also important to keep track of the pressure in the oxygen and diluent tanks even though you will soon find that you won't use very much of your available gas unless something is leaking.
When ascending you should make the standard safety stop for three minutes at five meters. When doing deco stops at this depth it is recomended to increase the partial pressure of oxygen to 1.4 bar. Reaching 1.4 at this shallow depth means that you need almost 100% oxygen in the loop which require careful purging of diluent. Before purging you should close the automatic diluent valve so you dont accidentily inject any diluent while emptying the loop. After doing the stop and approaching the surface you need to switch the computer over to use the low setpoint. If you forget the system will continously inject oxygen in order to reach the unrealistic value of 130% oxygen at the surface.
Back on land or on the boat you can turn the electronics off. Before you lay the unit down you should unscrew the manual oxygen injection valve on the exhalation lung in order to let any exhaled water and spit out. Close all the gas valves until it is time for the next dive. Before doing a repeated dive you need to make sure you have enough scrubber time and gas left to make a second dive. Before jumping into the water you follow the procedure above except that you don't have to recalibrate the oxygen sensors again.
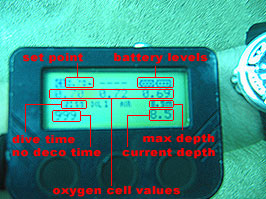
The computer The Evolution CCR is fitted with a computer called Vision. It has more features than what can be described here so it is recomended to see the manual for details. The main parts of the display is shown in the picture below.
The set point up in the top left corner is the target set point that the computers tries to maintain. The oxygen cell values are the actual pressure readings from the three oxygen sensors. The computer uses the average of the two nearest readings as input to the oxygen control system.
The no deco time shows the available dive time remaining before decompression stops will be needed on the ascent.
The three buttons can be operated with or without gloves. The buttons should be pressed firm, but not hard, until a line shows above the button which indicates that the buttonpress has been detected. The computer is operated by pressing one or more buttons at the same time. The most common button combinations are:
Dive planning Rebreather dives can be planned with tables, desktop computer software and dive computers. Many CCRs, like the Evolution, also come with dive planning software built in. For most non decompression dives it is sufficient to use a table and keep the on board computer as a backup. If you plan to do dives requiring decompression then using desktop computer software is recomended and that topic is discussed in more detail in the Trimix CCR article . Below is a cookbook recipe how to plan a dive requiring only an open circuit air table and a calculator.
1 Find out how deep the dive spot is. For instance 30 meters.
2 Calculate equivavlent air depth EAD using the forumla EAD = (Depth - 10 x ppO2) / 0.79 + 2.66. In the case of the rebreather with set point 1.3 the EAD = (30 - 10 x 1.3) / 0.79 + 2.66 = 24.2 meter.
3 Lookup in your favorite open circuit table the maximum no decompression limit for the depth. For instance US Navy Standard Air Deco table (1995) gives you a no deco time of 40 minutes for a maximum depth of 24.3 meter. As an alternative to step 2 and 3 you can use constant ppO2 tables published by IANTD to obtain your maximum no deco time.
4 Make sure that the EAD does not exceed the maximum narcotic depth you want to accept. Normally anything down to 35 meters EAD is fine.
5 Make sure the no deco time does not exceed your available CNS oxygen time for the oxygen partial pressure. NOAA ppO2 table states that for a ppO2 of 1.3 bar then the maximum time for a single dive is 180 minutes and daily maximum of 210 minutes.
6 Make sure the dive time does not exceed the maximum scrubber time. For the evolution that means 2 hours in cold waters and 4 hours in warm waters.
7 Calculate gas consumption. Normally you would use around 1.5 liter oxygen per minute for avarage workrate and doing the calculation with 2 liter per minute accounts for some leakage. That means that we need at least 40 x 2 = 80 liters of oxygen for our dive. The Evolution CCR is equipped with 2 liter oxygen cylinder so we would consume 80 / 2 = 40 bar of pressure from the oxygen cylinder. This should normally not be a problem since most of the times when you fill oxygen you will get closer to 100 bar.
8 The use of diluent is less critical. Normally you would use something like 20 to 30 bar. However since we use air as diluent we normally fill air from a normal filling station so we would get around 200 bar anyway. Important to note is that 200 bar in a 2 liter tank is getting consumed very quickly if used in open circuit mode. With a respitory minute volume of 30 liters per minute at 30 meters (4 bar) depth it only lasts (200 x 2) / (30 x 4) = 3 minutes! Not very good as bailout.
Emergency procedures
A CCR is a complicated system and there are many things that potentially can go wrong. Most of the malfunctions can be corrected or controlled without the need to abort the dive. If you do not feel confident that you can correct the problem you always have the option to switch over to the open circuit bail-out tank and abort the dive.
Bail-out If you can't solve the problem using the CCR you have to bail-out. The bail-out procedure is:
Locate and grab the bailout regulator
Turn on the gas (keep bottle just slightly open when not used)
Inhale, close mouthpiece and let go of breathing loop
Start breathing from bail-out
Switch computer to open circuit mode
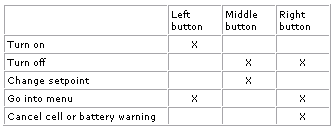
Water in the breathing loop Getting a little bit of water in the breathing loop is common and is easiest noticed by a gurgling sound when exhaling. The water may get in by a leak around the mouthpiece or by temporarely losing the mouthpiece. A small amount of water is no problem and can be removed by closing the mouthpiece and let it float above the head while shaking it a little bit before bringing it back to the mouth. This procedure will let the water leave the breathing loop and end up in the exhalation bag which can hold a fair amount of water without any noticable problems. If the loop is getting totally flooded it is still possible to breathe the reabreather in open circuit mode by pressing the rubber part of the ADV while breathing in. The picture below shows where to press on the ADV to trigger it to inject air. The diluent cylinder is quite small so breathing the system in open circuit mode is very gas consuming and you will soon run out of gas so bailing-out may be necessary in this case.
Manual diluent injection using the ADV (top view left side of head)
High oxygen alarm Once in a while you experience a high oxygen warning where the head up display flashes red and the buzzer sounds. Simply do a diluent purge to lower the oxygen level. A diluent flush means emptying the breathing loop totally of gas while injecting diluent. The easiest way to do it is to hug yourself with the left arm on top squeezing the counterlungs while the right arm is pressing the manual diluent injector button.
Electronics totally gone In the unlikely event that the electronics would totally fail and you can't get any information from the computer you can still use the CCR in semi-closed mode. This is possible because the diluent is always breathable and at depth the partial pressure of oxygen is high enough to allow the diluent for reuse. Start by doing a diluent flush to get rid of gas with unknown gas content. It may also be a good to shut off the oxygen valve so the system would not accidentilly inject to much oxygen if the computer can no longer be trusted. After the diluent flush you continue diving the unit in semi-closed mode. Semi-closed mode means to exhale throw the nose every fourth breath while at the same time inject air with the ADV as shown on the picture above. This is more economic than using the system in fully open circuit mode.
Failing solenoid If the solenoid is getting stuck in the open position you will quickly exceed the maximum oxygen level. In this case you should first do a diluent flush and verify that the oxygen is again continously rising above the safe level. If this is truly the case you need again do a diluent flush to lower the oxygen value. In order to prevent the oxygen to again rise to a dangerously high level you have to shut the oxygen valve and manually open it when the oxygen level goes low.
Manual control of oxygen injection
If the opposite happens and the solenoid is getting stuck in the closed position it will take a while before the oxygen levels falls to a dangerously low value and the system warns you about it. This is one of the reasons you should always keep an eye on the oxygen partial pressure. If the solenoid fails to inject automatically you can simply solve it by manually injecting oxygen on a frequent basis.
Scrubber exhausted If the scrubber is getting exhausted you will experience hypercapnia. It feels like you constantly gasping for air regardless of how much you are breathing. If this happen you can do a diluent flush and switch to semi-closed mode so that some of the carbondioxide is constantly being removed
Convulsions May be hard to stop but many people have reported that you first feel it as twitching of facial muscles. If this happen it is time to inject diluent. This will make you positively bouyant which will take you up and if you convulse take you to the surface. If possible, do a diluent flush.
Running out of gas If you run out of oxygen you can switch over to semi-closed mode. If you run out of diluent you can, if you have the right connections, connect your bailout bottle to the manual diluent injector on the front.
Running on wrong set point on dives deeper than 25 meters If you forget to switch to the high setpoint after reaching the bottom you have to shorten your dive. If it is just a few minutes after reaching the bottom you can shorten the dive and deco longer on the way up. If it is less than 5 minutes after reaching the seabed then shorten the dive with 5 minutes and do additional 5 minutes of deco at 6 meters. If it is longer but still less than half of the total planned divetime then abort the dive and deco for 10 minutes at 6 meters. If you totally forget switching setpoint then abort the dive and ascent with 1 meter per minute to 6 meters depth, deco as long as is possible and stay on bends watch after reaching the surface. Note however that on shallow dives (<20m) that are not too long (<50min) it is not dangerous to run on the low setpoint since the EAD for a ppO2 of 0.7 at 20m is 19m,
All oxygen cells showing different values Go into the menu and look at the cell check option. The cell check option will show you what the oxygen sensors should show after a complete diluent flush. After looking at the value you should do a diluent flush and see which of the three oxygen sensors that is closest to the expected value. After choosing which sensor to trust you have to manually adjust the oxygen partial pressure based on the working oxygen sensor.
A few tips if diving solo with a rebreather
Use plenty of margins for gas, bail-out bottle and scrubber to minimize risk and maximize psycological confidence.
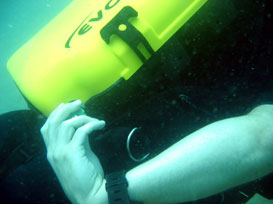
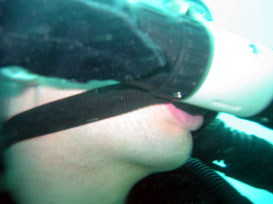
Use neckstrap for the mouth piece so that if you convulse you do not loose the mouth piece.
Neckstrap to prevent loss off mouthpiece in case of convulsion
Neckstrap fitted to diver while diving
Use a convex, wide angle mirror so you can do a bubble check on yourself. A suitable type of wide angle mirror is the small ones that you can buy and attach to the rear mirrors of cars.
Use flashligts turned on fixed in harness to help people find you if you go unconcious.