Diving deeper than 50 meters requires a new set of skills and equipment not needed in shallower water. This article discusses the use of helium and decompression tools and techniques required for safe deep dives.
Introduction Pushing your limits is interesting!! In diving the most obvious limit to push is the depth limit. To safely go deeper you need to learn a new set of skills and equipment. One of the things you will learn is how to add helium to your breathing mix. Adding helium is mostly an academic skill since breathing helium doesn't feel very much different compared to breathing nitrox (unless you speak). The second skill to learn is how to plan and execute more complex decompression schedules. This article will give you a practical introduction into boths topics and how they apply to rebreather diving. The article is obvoiusly not a replacement for a trimix course but should be seen as a compliment and useful to read before doing a trimix CCR course.
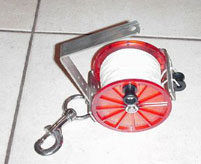
More equipment To safely go deeper you need to bring a few more items than you would use for shallow dives. In order to make it easier to keep track of your depth at decompression stops you bring an inflatable buoy and a reel. You only use the reel for the shallower and longer parts of the decompression since the deeper stops are only a minute or two. A reel of at least 40 meters that you attach to the buoy which is inflated at around 30 meters works fine.
A reel used for decompression stops
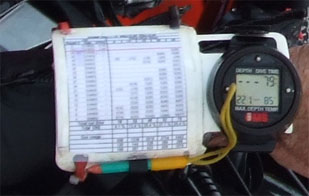
You would also want to bring a decompression dive plan that shows you at what depth and for how long to stay at each depth. This can be either one of the pre published deco tables from IANTD or you can generate your own from your favorite desktop software. If you print out your own you should print one deco plan for decompression on the rebreather and one for bail-out and then laminate them to make them water proof.
Deco plan fitted to arm where it is easy to see together with backup dive timer.
If the electronics of the rebreather fails while diving you still would need to follow your decompression schedule. For that reason you would also want to bring a backup dive timer.
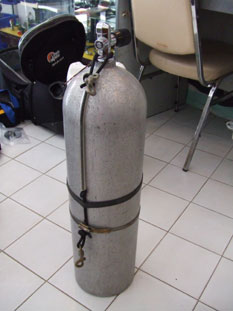
Deep dives requires long deco and therefore big bailout tanks
If something goes seriously wrong at a decompression dive and you have to bail-out you still need to follow a decompression plan. Since decompression tends to take a long time you need alot of bail-out gas. In order to shorten the decompression time it is advisable to also bring an oxygen rich mix for the long shallow stops. Pure oxygen roughly cuts the decompression time to a third (compared to air) and spending 10 minutes at 6 meters is much nicer than staying 30 minutes. However, pure oxygen can only be used from around 6 meters so having a somewhat leaner mix like nitrox 50 extends the usable depth range of the mix.
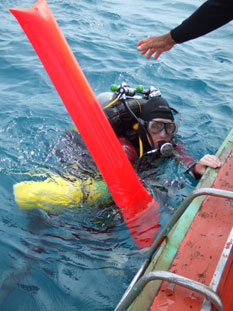
An inflated deco buoy at the surface
Lean bail-out on the Left and Rich bail-out on the Right (from the divers point of view).
A summary of new equipment you need for deep dives:
Reel
Deco buoy
Deco table for rebreather and bail-out
Backup dive timer
Deep mix bail-out tank
Rich deco bail-out tank
Planning deep dives The acronym for "Good Ccr Divers' Main Objective Is To Live" helps you to remember the main parts of CCR dive planning:
G - Gas management (CCR & Open Circuit) > How much gas do you need to bring
C - Carbondioxide (Scrubber) > How long scrubber time
D - Deco (CCR & Open Circuit tables) > What profile to use to get back to the surface
M - Mission (What to do during the dive) > What's the objective of the dive
O - Oxygen (CNS & OTU) > How much is the CNS clock ticking up
I - Inert gas > How much helium should there be in the diluent
T - Thermal > How thick suit do I need
L - Logistics > Practical arrangement to prepare and transport equipment
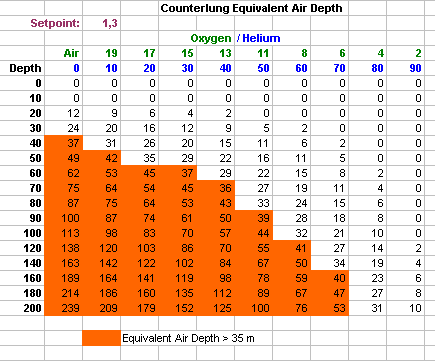
The first thing to do when planning is to decide how much inert gas or, in our case, how much helium that is needed. In order to decide the amount of helium we need to think about the reasons for using helium. The first reason to use helium is to minimize the narcotic effect of nitrogen. The table below shows the equivalent air depth for different depths and heliair mixes with the narcotic areas marked in amber (EAD > 35m). In order to minimize the narcotic effect we should preferrably stay away from the amber area. For instance if we decide to dive to 70 meters a 50% helium based diluent is suitable.
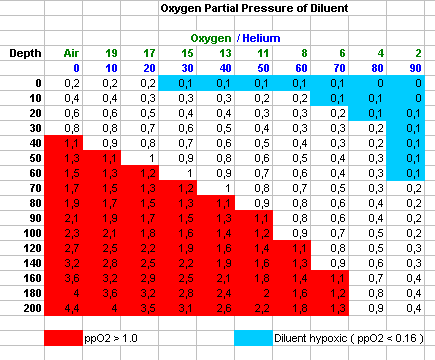
The second reason to use helium might not be as appearent when everything is working out fine. However, if you run into a situation with a high oxygen alarm you may get a bad surprise when trying to do a diluent flush. Using air as diluent below 50 meters will raise the partial pressure of oxygen above 1.3 bar. This means that doing a diluent flush will not be so efficient to lower the oxygen content. It is recomended to use a diluent that has a partial pressure of oxygen below 1.0 bar. It is worth noting that using too much helium will make the diluent hypoxic to breath by itself in shallow waters. This would normally not be a problem since the oxygen control system would make sure a sufficient amount of oxygen is available but needs consideration when using the CCR in semi-closed mode. The table below shows where oxygen levels are dangerously high or low.
Helium does not cause any new exposure problems unless you go deeper than 120 meters where you have to watch out for High Pressure Nervous Syndrome (HPNS) if you stay on only helium and oxygen. Interesting to notice is that adding 10% of nitrogen will buffer the mix and extends the maximum depth to 180 meters. If you like you can download the calculation spreadsheet from here.
Second we need to consider our decompression obligation. In theory we could just use the EAD and a standard air deco table. However, since trimix diving is still experimental in nature and it is better to use an exisiting desktop software package to generate the deco plan. Desktop software would also normally provide us with the gas volume needed. If it does not then you would have to look at the deco profile and use your respitory minute volume to calculate how much bail-out gas you need.
Decompression theory Decompression is not yet fully understood. Open circuit recreational divers normally rely on prepublished tables which have been tested millions of times over the years. Trimix rebreather diving has not yet been as well explored so instead it is up to the diver to take responsibility for their own safety. The first step of decompression planning is to decide what model to use. Currently the three most popular models are Bühlman, VPM and RGBM. All of the models can be adjusted to allow for more conservative or aggressive dive profiles. The Bühlman model, or Haldanian as it is sometimes known as, was the first one to be developed and is a theory based on hypothetical tissues. These tissues are said to represent the ability of the body to tolerate bubbles during decompression. The Bühlman algorithm allows a diver to ascent quickly from the bottom and then stay a longer time at shallower depth to decompress. However, many divers have reported that they actually feel less tired, which is an early symptom of decompression illness, after dives where they started their decompression profile by doing a few deeper stops. The Bühlman model can be tweaked into incorporating these stops by using what is known as gradient factors which is the model that is used on the Evolution CCR. With gradient factors you set a low and a high value for how conservative your profile should be. The low value represents the deep part and the high value represents the shallow part. Conservative values ranges from 0 which is the most conservative with slow ascent rate and 100 which is the most aggressive with fast ascent rate. Setting a low value for the low gradient factor would therefore slow down the first part of the deco profile and therefore include a few deep stops. A normal setting would be a low gradient factor of 15 to include some deep stops and a high gradient factor of 85 which means that the diver exits the water with 85% of Bühlmans recomended maximum tissue gas loading.
The good thing with having deco software integrated in the CCR electornics is that it constantly measures your actual depth. That means that if you would not end up on the depth that you planned for, if you have to bail-out or change the dive plan the computer would automatically adjust itself for those circumstances. The bad thing with computers are that they can be incorrectly set up, crash, run out of batteries or the visibility may be so low that you can't see the screen. Computers are also mainly developed to use during the dive opposed to be used before diving. The main benefit of using desktop deco planning is that you can see your dive profile in advance. You will then know well in advance how long the dive will be and how long your decompression stops at different depths will be. This enables you to mentally prepare for the dive. Desktop deco software use usually either the VPM or the RGBM model. Both are based on the theory of micro bubbles. The goal of the models is to predict a safe deco profile by not letting the micro bubbles grow into dangerous real bubbles as an addition to the tissue gas loading theory. Both models automatically generates dive profiles with deep stops without specific tweaking.
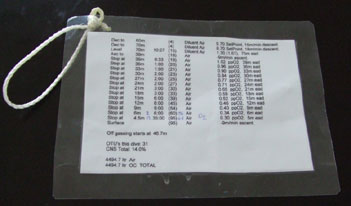
You can think of deco computers as a GPS and a deco plan as a map. You might not want to solely rely on a gadget to save your life but if you get disorientated or have to bail-out they provide a nice extra layer of safety. The solution when doing trimix deco dives is to use both. Set up the Evolution CCR to use gradient factors with deep stops and plan your dive with deco software. When planning with deco software you should print one deco plan to use with the CCR and print one plan to use for bail-out. Laminate both plans in plastic to make them water proof and make a hole in the laminated version so that you can clip it to the reel. You might want to use your hands for other things than holding a plan!
A laminated decoplan
Decompression in practice Performing a perfect decompression according to plan is the hardest thing in the beginning. The reason for that is that all other tasks can be performed at leasure without strict time limits. The main tasks you have to religously follow are:
Leave bottom on time - or your deco plan will be invalid
Ascend slowly (10m/min) to your first deco stop
Look at the runtime on your plan to see when to leave the deco stop
Ascend to next stop when your timer shows the runtime value.
Repeat the previous steps (watch runtime, ascend and stop) until the deco stops are a bit longer and shallower (25-30m)
At a suitable shallower stop you take out the inflatable buoy, attach it to the reel, make sure the reel is free, inflate the buoy and let the buoy loose. At the remaining stops you now have a stable depth indicator to help you keep your depth correct.
When you reach the last stop at 6 meters you switch over to 100% oxygen to flush out as much nitrogen as possible. If you are on rebreather you close the ADV, purge the counter lung and manually fill with oxygen. If you are on bail-out open system you switch to the 100% oxygen tank.
For the unexperienced diver it is easy to suffer from task overloading by trying to do the following tasks at once:
keep track of time
keep track of your depth and adjust buoyancy
keep track of next runtime value (when to leave current depth)
continously empty counterlungs and BCD during ascent
Helpful hints to make it easier for the beginner
Empty BCD before leaving bottom
Always keep well negatively buoyancy (swim up is easy, swim down is hard)
Be very, very careful when releasing the buoy so the reel line does not get stuck. Not fun to suddenly get pulled up!!
Memorize the deco runtime, stop duration and depth well in advance
When you gained experience you would obviously want to be more neutrally buoyant and don't have to memorize that much in advance.
In some situations it can be beneficial to release the deco buoy from the bottom. The main reasons to do this is if there are strong currents in the water so you may end up far from the boat. It is also good for the dive boat to see the deco buoys of all the divers well in advance so they can get early warning if something has gone wrong.
The Evolution deco computer If you fail to follow your own deco plan you will have to rely on the built in deco computer. When the computer determines that you need to perform deco stops the screen will look like below:
The time to surface is the minimum time you have to allow to reach the surface including ascending and performing decompression stops. The ascent ceiling is the depth you safely can ascend to and the current depth is where you currently are. It is VERY important that your current depth is always greater than your ascent ceiling.
When you first enter the water the time to surface value, for instance "7 TTS", will not be shown and instead the no deco time will be shown. The no deco time starts at 999 minutes and counts down during the dive until it reaches 0 when it is replaced by the time to surface value.
Bail-out configuration The choice of bail-out configuration in the first version of this article showed up to be the most controversial subject. This section has therefore been added to discuss the pros and cons of different bail-out configurations.
Having to bail-out should only be needed when things go seriously wrong. This means that the diver is under more stress so having things planned in advance and knowing your bail-out options is important. It is also easy to increase the breathing rate when being under stress which obviously is very uneconomic with open circuit especially at great depth so be generous with gas volume. The environment is also important to consider since it has a significant impact on getting back safely to the surface. Doing an open water dive in clear, warm waters of Thailand is very different from penetrating wrecks in the cold, dark and muddy waters of Sweden. There are also factors such as availability and price of helium, quality of filling station, type of analyzers and the amount of mixing efforts has an impact on gas choice. It seems natural to boil it down to three choices (or combinations of them).
Optimize simplicity - no mixing, no helium Use air as deep mix and pure oxygen as deco gas. The pros and cons are: + No mixing needed + No extra helium needed (cheap) - Narcosis will hit you hard when you want it the least - You have to get up all the way to 6m before your oxygen becomes usable
Optimize safety - simple mixing This option is to use mixes based on air which means nitrox as rich mix and heliair as lean mix. A common choice is to use nitrox 50 and heliair with as little helium as possible that still keeps you away from narcosis. The pros and cons are: + Simple to mix + Can be analyzed with O2 analyzer + Rich mix can be used about three times as deep as pure oxygen - More mixing and analyzing efforts than option 1
Optimize deco - advanced mixing This is custom trimix combinations. In the most extreme case this would mean using only heliox such as 50/50 as rich and say 15/85 as lean. In reality one would probably allow more deco obligation in exchange for less need of helium. The pros and cons are: + Minimal deco obligation - Most expensive option - More mixing effort than option 2 - Needs helium analyzer to analyze if not heliox is used
The most popular option seems according to rebreatherworld.com be to use at least a good portion of helium in the lean mix.
Problem solving Problem solving when doing trimix dives are similar to normal CCR dives with a few minor differences.
Semi closed mode When running in semi closed mode at greater depth you should vent air through your nose less frequently. The reason for this is that you waste more gas at greater depth and the ppO2 is high enough to make the air fine to reuse a few more times. Instead of using the rule of venting every fourth breath the rule is dependant on your depth. To get the number of breaths before venting you divide your depth by 10 and add 5 (vent freq = 5 + depth / 10). That means that for instance you exhale through your nose every 13th breath at 80 meters (5 + 80/10 = 13).
Bailing out Bailing out works as usual with the difference that you now need an additional rich mix to shorten the deco time. However it is now VERY important that you choose the right bailout bottle since breathing the rich mix at depth will quickly give you convulsions. A good habit is to always have the oxygen rich mix on your right and use the phrase "Rich - Right and Lean - Left" to remember which tank is which.
Nitrogen narcosis If you use air as bailout and switch to breathe air at 70 meters you will get nitrogen narcosis which will impair your abilities. Do not stay long on air here since both nitrogen and oxygen levels are high.
Credits v0.1 Thanks to Cedric Verdier that taught me pretty much everything that is covered in this article. v0.2 Thanks to jradomski, Mark Chase, jhaaja, schford, ScubaDadMiami, KevDD and Padowan of rebreatherworld.com for suggesting different bail-out mixes and early release of deco buoy.